
This guide describes the process for migrating User Profiles for Jira (Microsoft Attributes Sync) from Jira Data Center to Jira Cloud. Because the Cloud app differs conceptually and technically from the Data Center app, some manual steps are required. The following sections outline how to prepare, execute, and complete the migration.
Index
1. Before you start
The goal of this phase is to prepare your Cloud app, bring your DC app to a supported version, and decide exactly which user information you’ll migrate and how it will be sourced in Cloud.
Step 1 — Prepare the Cloud app
Install, connect, and configure sync so Cloud can serve as the new source of truth for user attributes on issues.
1. Install User Profiles for Jira
Install the add-on using our Installation guide.
2. Connect to Microsoft Entra ID
Microsoft Entra ID provides the data source for custom fields in Cloud. Establish the connection to enable attribute-based fields population. Find more information on how to install Microsoft Entra ID in our Administrator’s guide.
3. Configure synchronization
By default, the Cloud app synchronizes only non-closed issues. Adjust when an issue is considered closed or re-enable sync for closed issues if required. Consult our guide for more information on synchronisation settings.
Step 2 — Update the DC app
Update User Profiles for Jira Data Center to a supported migration version (at least 2.7.1).
Step 3 — Decide what to migrate
This section's goal is to understand how the apps differ, so you know what to carry over.
-
Conceptual and model differences
Our apps for Jira Data Center and Jira Cloud expose user information on Jira issues in different ways.
-
Data Center
User information is surfaced on issues through an extension of the hover profile or user information via custom fields.
In both cases, the data source is the set of user profile elements configured by the administrator. They are automatically synchronized from LDAP-based directories (e.g., Active Directory, OpenLDAP) via the "Mapping for LDAP Attribute(s)" configuration, or maintained manually in Jira by each user if no "Mapping for LDAP Attribute(s)" is configured.
-
Cloud
The Cloud version of our app also provides user information via custom fields. Here, the data source is Microsoft Entra ID (Azure AD). Depending on the configuration, the custom field values are resolved for the reporter, assignee, or another reference user field of the issue and can be viewed, searched, and used in Jira Automation like any other custom field. To surface user information on issues in Cloud, make the information available via Cloud custom fields linked to Entra ID attributes.
-
Understand what can be migrated
-
Profile elements synced from LDAP in DC can be migrated if equivalent attributes exist in Entra ID.
-
Profile elements filled manually in DC can be migrated if that data is moved to Entra ID attributes first (outside the app).
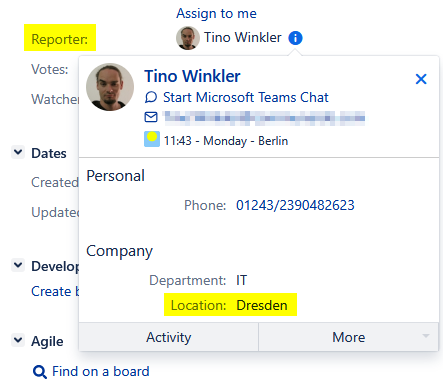
To illustrate how this affects migration, two examples of user information displayed in work items throughout this documentation are used: the manager of the assignee and the reporter's location.
-
Identify hover profile information to recreate as Cloud custom fields
User Profile Elements can be configured in the DC version of the app to be displayed on the hover profile on work items.
Identify such elements by checking each element's configuration on the User Profile Configuration screen in Jira DC. Access this screen via:
Administration (cog icon) > Apps > User Profile Configuration (under User Profile Settings).
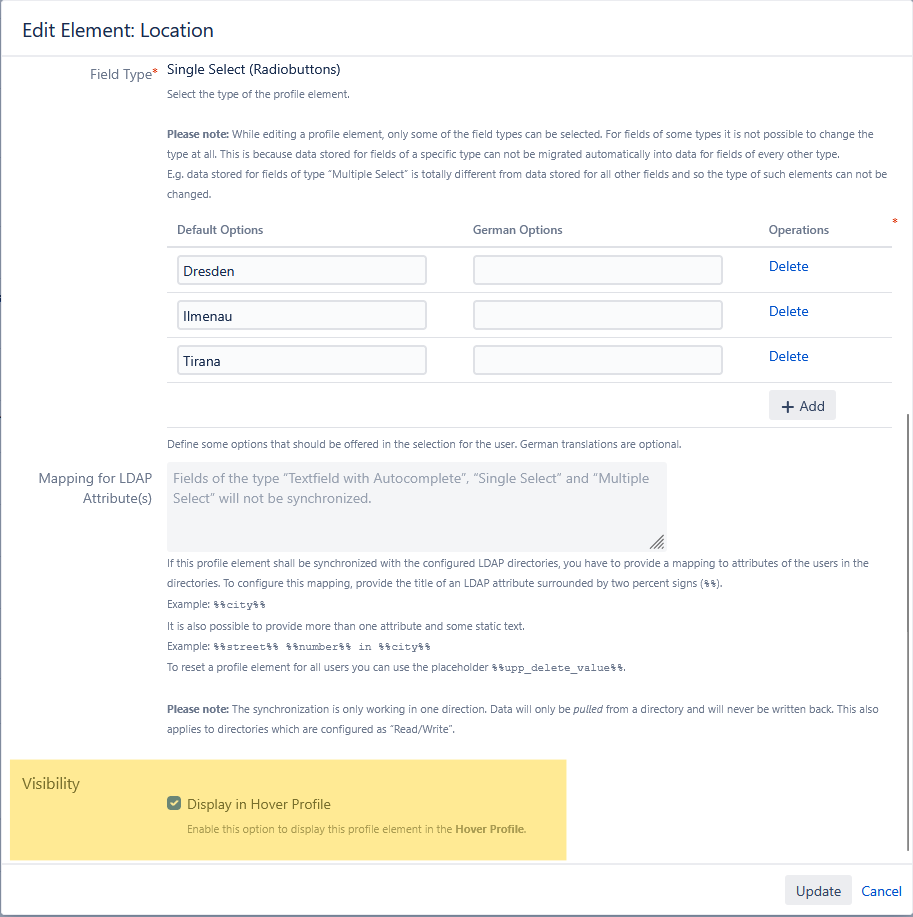
If the “Display in Hover Profile” checkbox in the “Visibility” section is selected, the profile element appears on the hover profile:
If the information for those elements must be available in Cloud, create a custom field after migration for each element.
This is possible only if the data is or can be made available via Microsoft Entra ID (as described above).
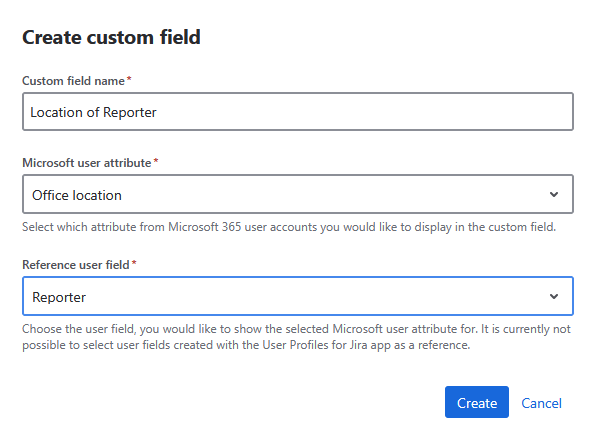
In this example, the data came from a profile element with predefined values that users had to manually fill in. Fortunately, the customer has the same data in the Entra ID attribute “Office location,” so the user information can be migrated.
-
Identify the custom fields that are to be migrated
To identify the fields to be made available in Cloud, first find the fields controlled by our app in Jira Data Center. This is best done via the User Profile Fields configuration screen in Jira DC.
This screen can be found via:
Administration (cog icon) > Apps > User Profile Fields (under the heading User Profile Settings).
For each field on this screen, first decide if it should be available in Cloud. Then, verify if the data can be made available by clicking “configure” and checking the profile element the field is based on:
The User Profile Configuration screen shows where the field's data comes from:
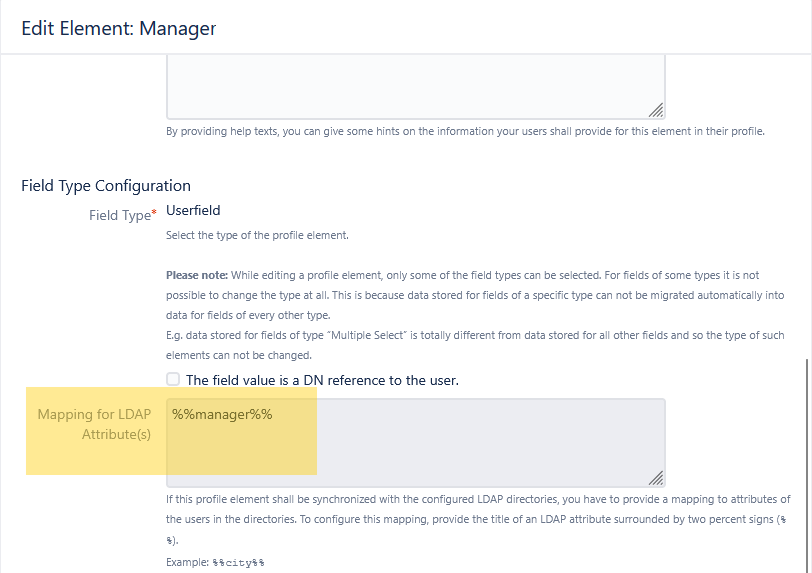
If data is or can be made available via Microsoft Entra ID (as described above), you can migrate the field to Cloud. Since our customers’ data is available via the Entra ID attribute “Manager“, user information can be migrated.
2. Run the migration
Use Atlassian’s Cloud Migration Assistant for Jira on your Jira Data Center instance and include the app during assessment and migration configuration.
Find out more about how to assess and migrate apps.
When running app vendor checks, select app User Profiles for Jira (Microsoft Attributes Sync) so the assistant can flag items and help you plan the remaining manual steps. Two warnings will be reported, for informational purposes:
-
Display user data via custom fields in Cloud
-
Jira Cloud does not support direct profile enhancements by apps. Instead, user data can be synced into custom fields to make it visible on issues.
-
-
Synced fields need to be re-created in Cloud
-
After migrating to Jira Cloud, you need to re-create fields that sync user data from MS Entra ID. Click on "Download report" below to see all fields that currently sync data from user directories.
-
This also includes a CSV report containing all synced fields, their LDAP mappings, and usage in selected projects
-
3. After migrating to Jira Cloud
Proceed to integrate your Cloud custom fields and re-establish any references to ensure that views, reports, and automation continue to function correctly.
Step 1 — Configure Cloud custom fields for former hover profile info
Create new Cloud custom fields for each hover-profile element you decided to keep and link them to the appropriate Entra ID attributes.
Step 2 — Recreate DC custom fields in Cloud
For each DC custom field you are migrating, create the corresponding Cloud field and map. Use the configuration in Data Center as a reference:
-
Reference user field: use the same reference user field as in DC (e.g., Assignee, Reporter).
-
Microsoft user attribute: choose the Entra ID attribute that either:
-
replaces the LDAP-mapped attribute from DC, or
-
stores data previously maintained manually in DC (after you’ve moved that data into Entra ID).
-
Example
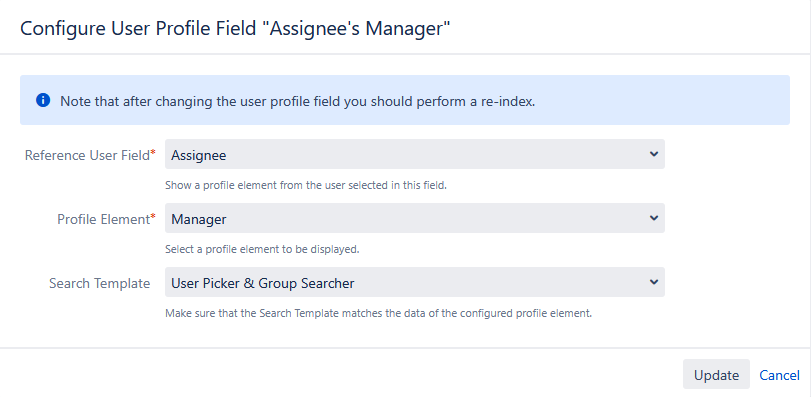
Old (Data Center) field “Assignee’s Manager”:
-
with Reference User Field “Assignee”
-
and profile element: “Manager”
-
mapped to LDAP Attribute “manager“
-
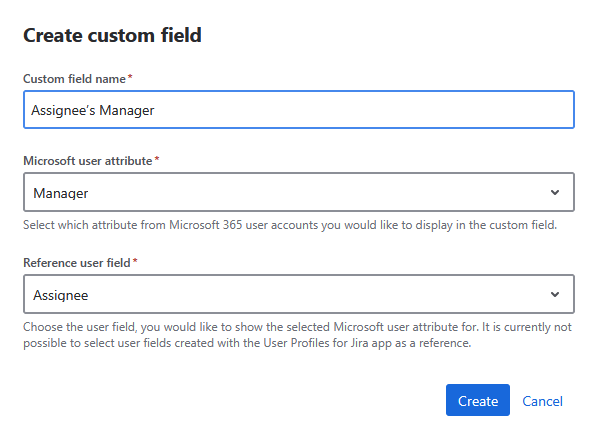
New (Cloud) field “Assignee’s Manager”
-
with Reference user field: “Assignee”
-
Microsoft user attribute: “Manager” (replacing LDAP Attribute “manager”)
Step 3 — Wire up fields and update dependencies
Because Cloud custom fields are newly created, you must reconnect all locations where the corresponding Data Center fields were used.
Automation rules and smart values
Automation rules that referenced DC custom fields will likely require updates in Cloud, including smart values. Field types and data shapes can differ between DC and Cloud, so review and adjust your smart values accordingly.